The second part of the series of the blog post is to leverage the Microsoft Azure AD capability to deliver the authentication capability for the Dynamics 365 Portal.
There are 2 parts of the Azure AD that we can use depending on the audience:
- Internal-facing Portal: Azure AD
- External-facing Portal: Azure AD B2C
Now, let’s walk through the detail on each part.
Azure AD Authentication
The Azure AD authentication use case is predominantly for internal users such as employee or contractors accessing an internal company’s portal, such as employee self-service portal.
This feature is enabled by default for Dynamics 365 Portal with this specific Site Setting to look for:
Authentication/Registration/AzureADLoginEnabled
This will provide seamless authentication for all internal users.
How about guest users, such as contractors or partner? Azure AD provides the ability to invite Guest Users via the Azure AD B2B.
Azure AD B2B use case would be for the Partner Portal functionality.
To enable the guest user access, we first need to have the user added in Azure AD as “Guest User”

In this example, I’m going to add my work account (@barhead.com) to my personal instance (@andz88.com). Once invited, I’ll receive the invitation, click on the Get Started to “redeem”/confirm the invitation. You’ll notice that you don’t have access to any application, but that is fine.

Once confirmed, I now can login to the portal by clicking on the Azure AD login method using my work (external) account.
Note: If the Azure AD is configured using Federated auth with AD FS, the Portal Azure AD auth also will use AD FS.
Demo:

External facing portal with Azure AD B2C
Azure AD B2C is the option for external users, typically for the public facing portal, such as customer self-service, community portal or partner portal.
Note: at the time of writing this article, Azure AD B2C deployment does not include some regions like Australia: https://docs.microsoft.com/en-us/azure/active-directory-b2c/active-directory-b2c-reference-tenant-type
The good news for Australian-based users, Dynamics 365 Portal Authentication is only using Azure AD B2C for the user object ID and securely storing the login credential, PII and other profile information is stored in Dynamics 365, which is hosted in Australian Data Centre.
To implement Azure AD B2C authentication, I would recommend using the Open ID Connect authentication method. This is the commonly used authentication method that is available from most of modern ID/Authentication providers. So, to begin with, there are 3 main Site Settings that you will need to pay attention to enable any kind of Open ID Connect authentication:
- Authentication/OpenIdConnect/[provider]/Authority
- Authentication/OpenIdConnect/[provider]/ClientId
- Authentication/OpenIdConnect/[provider]/RedirectUri
The [provider] part of the settings should be replaced by the name of the authentication method/provider that you would like to name (this also become the display name of the authentication button at the sign in page).
From the Azure AD B2C perspective, once you’ve created the Azure AD B2C deployment, you will need to add Dynamics Portal application to the list:

Create the application, make sure that the “Allow Implicit Flow” set to Yes. Reply URL should be in the format “[portal domain]/signin-[Federation-Name]” (Ref: https://docs.microsoft.com/en-us/dynamics365/customer-engagement/portals/azure-ad-b2c)

Once the Dynamics Portal application added to AAD B2C application, you’ll need the ensure to set up the user flows/policies:

At least configure the Sign in and Sign Up & Password Reset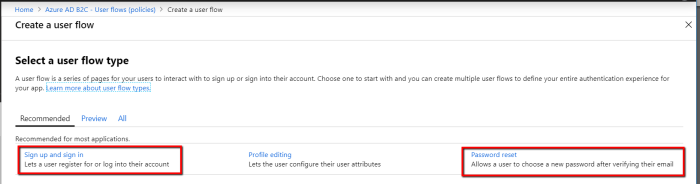
In particular, on the Signup and sign in policy, set the bare minimum information for the claim, such as email address, first name and last name and keep the rest to be managed in Dynamics 365 (unless you would leverage the full capability of Azure AD B2C to manage the profile). The tips & tricks on configuring the claim I’ll discuss in the next posts.
Once configured you will need to grab the 3 most basic information: Authority, ClientId and Redirect Url.
To find the value for the “Authority”, open the Sign up and sign in policy that you’ve created and click on Run user flow:

It will open a panel, click this well-known/openid-configuration link to see the JSON metadata:

And grab the value from “issuer” to be value for the Authority.

The value of ClientId is the GUID of the application that you created in the previous step:

And RedirectUri is the from the Reply URL that we set in that application

Once configured, you will be able to sign in using users that have been registered in the Azure AD B2C:

Hope this helps. In the next post, I’ll discuss using some 3rd party identity providers as the alternative of Azure AD B2C.
Further Read:
https://docs.microsoft.com/en-us/dynamics365/customer-engagement/portals/azure-ad-b2c
