After sometime of doing the research and getting my courage to start recording content for YouTube, I’m pleased to launch a new YouTube Channel called: Power Platform Clinic (https://www.youtube.com/channel/UCWf-GCQz9zrdo4-79EkFKbQ)
This channel is dedicated to answer questions from the community with a content that I hope to be clear enough and helpful for the broader community to use and learn.
Within this channel I’ve started with the “How-To” series that begins with the How to Configure Omnichannel for Customer Service and the next one that is already in production will be related to the PVA integration with Omnichannel.
Background Story
Note: If you are not interested in story, you may want skip this background story and just go straight to the YouTube channel 😉
The story that I’m sharing here is aimed help/encourage others, who might be in similar position as me, to be encouraged to help/share to the community.
Some of you might know that I have cameraphobia and anything of being recorded. Every time I’m doing recording, I have to gather all my courage. So far I only do few online recordings such as:
- Certified for CRM on CRM Rocks (2016): https://crmrocks.com/2016/09/14/certified-for-crm-with-andre-margono/
- Bot Framework for Dynamics CRM Presentation at Melbourne Dynamics 365 UG: https://www.youtube.com/watch?v=qb8DCQyaFl4
- 2 Minutes Tuesday with Gus Gonzalez: https://www.youtube.com/watch?v=cBlgtQ7cQww
Since then I’ve never do any new recording or something similar. Elaiza Benitez and Ee Lane Yu have asked me a few times to be “featured” in their series, but I turned them down, as I’m being so nervous to put myself in front of camera & mic.
In the past few months, as we are in the COVID-19 lockdown and things have move to online meeting, it has become a training ground for me to overcome my fear (at least I’m more used to sit in front of webcam & speaking)! So, it is apparently a kind of blessing in disguise for me.
The second motivation for me to start this channel is that I’m inspired by my dad, he’s a retired doctor, but in this kind of COVID-19 crisis, he has offered himself to be available and become the front-liner to help the patients. In the absence of my medical knowledge and capability, I can only help and contribute to the community with my technical/IT knowledge. Thus, the brand name: Power Platform Clinic is chosen, as I would like as much as possible to give back to the community with answering their question, providing help and/or consultation.
Side note
On a side note of recording my own YouTube channel that I’m going to deliver in English, myself and some friends from Indonesia (special mention: Juneidi Tsai) are also starting to producing Power Platform related content using Indonesian language in our mind to help the local community grow (I was coming from non-English speaking community). If you are Indonesian and would like to subscribe to the other channel please visit: Power Platform Indonesia Youtube channel: https://www.youtube.com/channel/UCFguHbcQv4In1AL91eLLmzA


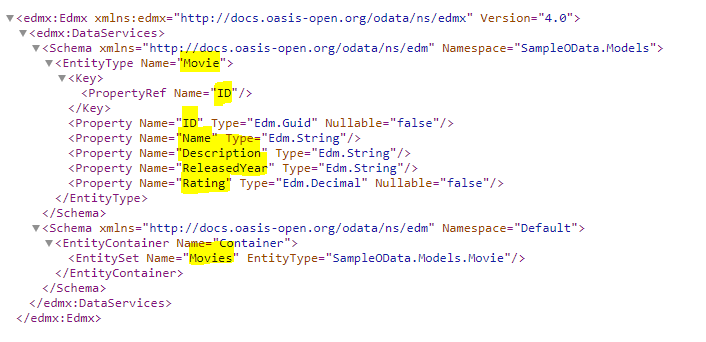


 Voila, C# classes are generated!
I hope this will be helpful for us to adopting the new CRM Web API!
Voila, C# classes are generated!
I hope this will be helpful for us to adopting the new CRM Web API!


You must be logged in to post a comment.