Be Careful with Minified Javascript with CRM 2015 Mobile App

Recently myself and my team are troubleshooting an issue with the CRM mobile app. The issue is that when the mobile app is trying to connect and getting the latest metadata it always stuck and fails at the step 4/5 of the configuration wizard.

We’ve found an article on an open source documentation: https://github.com/thuld/CrmFetchKit that says:

“Do not use the minified version (CrmFetchKit.bundle.min.js) in combination with the App for CRM. The App for CRM seems to have problems with minified code. The minified version prevents the successful configuration of the app (step 4/5 of the configuration wizard failed).

This issue affects all versions (3.x.x). The reason for this issue is unknown, Microsoft support did not provide any details.”

Once we used the non minified version of the javascript the configuration wizard of the mobile apps completed successfully.

HTH!

Theming in Dynamics CRM: Doing It Right

Dynamics CRM 2015 Online Update 1 (7.1.0) comes with the new feature that allows to apply theme and provide your Dynamics CRM application with branding capabilities and adding a sense of CRM application ownership.

To get started working on theming your Dynamics CRM application, navigate to Settings > Customizations > Themes.

Best practice is to create a clone of the CRM Default Theme by selecting the existing “CRM Default Theme” and clicking the CLONEbutton, so that by default, your custom theme will have the base colour.

dynamics crm theming 1


What happens if you directly create a new custom theme? Your custom theme will be defaulted to black, and it is quite annoying to change it one by one.

dynamics crm theming 2


The downside of the theme editor is the absence of colour picker. So for us to get a quick result of the look and feel of the custom theme that we are configuring, there is a great web app publicly available to help you: Dynamics CRM Theme Generator.

dynamics crm theming 3


Once you are happy with the look and feel, simply put the colour back to the custom theme.

Adding organisation logo will improve the sense of ownership of the application. The logo will be taken from Dynamics CRM Web Resources. So, you could create and upload a new logo as a web resource. The recommended image size would be around 400px width x 50px height (Ref: https://msdn.microsoft.com/en-us/library/dn932133.aspx)

Once you are happy with the theme, don’t forget to publish the theme by clicking the “PUBLISH THEME” button at the top of the theme editor form.

dynamics crm theming 4


Now, you should have your theme applied to your Dynamics CRM Organisation.

dynamics crm theming 5


Happy CRM Theming!


This post was originally posted at my company’s blog: http://dynamicscrmcoe.com/theming-in-dynamics-crm-doing-it-right-2/

CRM Online Trial Setup – Today’s Update

A couple months ago Jerry Weinstock pointed out in his Tip of The Day post regarding the new trial setup experience. It is just in matter of couple months away from that post being published, we can see how committed the Dynamics CRM product team in providing a better service for their customers.

Today I’m about to spin up a new trial instance to see CRM 2016 in action (more blog posts to come). And the concierge page has been updated again! Now, back to the main point of the tip. To get a straightforward trial setup, it is more obvious than before, select “Self-Start Trial”.ConciergeTrialDec15.png

It will then open up the well known trial wizard:

TrialWizard.png

HTH!

Quick Tips: Safe Guard Your CRM Online Production Deployment!

Dynamics CRM Online came up with Sandbox functionality (ref: https://technet.microsoft.com/en-us/library/dn659833.aspx) that provides separate instance for development/testing purpose. Sandbox instance comes up with “Admin mode” functionality that allows the admin to turn on/off.

Administration Mode.png

Admin mode allows users with System Administrator or System Customizer security privilege to access the CRM system, while the rest will receive a notification, similar to:Normal User Warning.png

It is a common requirement for production deployment, during this period that normal users should not access the production environment to prevent data loss and interruption when the changes/deployment is in place. Now, as the “Admin mode” functionality only available for Sandbox instance at this moment, the option that we can do to achieve this is to switching Production instance to Sandbox instance temporarily, enable the Admin mode, put some friendly maintenance warning and that’s it, your normal user won’t be able to access the instance until the Admin mode has been disabled. Don’t forget to turn the instance back to Production.

This functionality is also useful to prevent normal users to access development environment and get lost in it 🙂

HTH!

Dynamics CRM Online – Exchange Online – Server Side Sync with Custom Domain Workaround

Disclaimer: this workaround is categorised as unsupported by Microsoft as described in the following Best Practice article: https://technet.microsoft.com/en-gb/library/dn887218.aspx

Recently I just configured a Dynamics CRM Online to Exchange Online that has custom domain. It was a straight forward process for environment that is using “onmicrosoft.com” domain as their username and email address. However, in most of real cases, it should not use onmicrosoft.com domain for production environment, as it does not reflect the branding and ownership of the company. Most of the customers will use their own domain, e.g: emailaddress@contoso.com.

For this implementation I have followed through the regular guide on approving the mailbox as described in: https://technet.microsoft.com/en-us/library/dn832109.aspx. However as the email address is using the customer’s domain name, I always encounter an error during the “Test and Enable” the mailbox: The mailbox location could not be determined while sending/receiving the email message <Message Subject>. The mailbox <Mailbox Name> has been disabled for sending/receiving email and the owner of the associated email server profile <Email Server Profile name> has been notified.

That error message is listed up on the troubleshooting guide on: https://technet.microsoft.com/en-us/library/dn850386.aspx. The resolution for this error is: “You will see this alert if your email server profile (Settings > Email Configuration > Email Server Profiles) is configured to use the Auto Discover Server Location option but auto discover cannot detect the location of your mailbox. If this issue occurs, check with your Exchange administrator to verify your network is configured for auto discover. You can update the email server profile and choose No for Auto Discover Server Location. Then provide the Exchange web services URL for your Exchange deployment.”

Now, for Dynamics CRM Online, it seems Microsoft have applied a different script/css to hide the Auto Discover Server Location settings. As a workaround I need to do some HTML hack to bring back the elements to be editable.

Now it’s the step by step guide:

  1. Open the Exchange Online email server profile from Settings > Email Configuration > Email Server Profiles.
  2. Using browser’s developer tool (in my example, I’m using IE, but it’s up to you to use your favorite browser). Find the auto discover element: with id useautodiscover_c and useautodiscover_d, remove the style tag that hide the element:
    AutoDiscover.png
  3. Now the Auto Discover Option should be visible, but they are in disabled state. So, we need to remove the disabled tag on the following element: div with id: useautodiscover and and input radio button with name: rad_useautodiscover.AutoDiscover2.pngAutoDiscover3.png
  4. Now you should have the Auto Discover Server Location tag to be editable, set it to No.
    AutoDiscoverEditable.png
  5. Then the next part is to make Incoming and Outgoing Server location to be editable and set the exchange online web service address: https://outlook.office365.com/EWS/Exchange.asmx. To make the fields editable, find the following elements: input with id: incomingserverlocation and outgoingserverlocation. 
    Incoming.png
    Outgoing.png
  6. Now you should have the fields editable:
    Editable.png
  7. Once you’ve specified the above configuration, save and close the Email Server Profile for Exchange Online. Then go back to the mailbox and run again the “Test and Enable” process. You should have the server side sync worked.

HTH!

Automatic Case Creation Gotcha: Keep the predefined fields as it is.

Recently I’m working in a CRM Online environment with CRM 2015 Update 1. One of the use case that I’m working on is Email to Case. I read through the article from Microsoft to get this functionality worked: https://www.microsoft.com/en-us/dynamics/crm-customer-center/automatically-create-a-case-from-an-email.aspx.

One of the gotcha that I encountered is that when I’m configuring the record creation rule and creating a case record, some of the fields are pre-populated with some weird mapping (null(Channel Properties)):

Prepopulated values

And when I tried to map some of these fields to something else, for example I map the stakeholder to the email sender and clear out the value from Contact field, I usually encounter a failure in the case creation process:

Error_Encountered

The error description is apparently showing up that the contact in “Contact” field does not belong to the customer in my “Stakeholder” field. And when I tried to open the Create: Case properties, I found out that the Contact field is not cleared out in the automatic case creation workflow:

WeirdReference

So, as a workaround. I need to let the pre-defined field to work as it is. It will then resolve the Case creation mapping as the following logic:

IF the sender belongs to an account

  • Set the Customer to the email sender’s parent account and set the sender in the Contact field.

ELSE

  • Set the Customer to the email sender’s contact record.

Apparently there is an KB article that related to this: https://support.microsoft.com/en-us/kb/3094208. Thanks to Feng Wang from Microsoft support to point out to this article.

  1. Click on Set Properties and re-add any custom mappings. The out-of-box Customer and Contact fields will automatically populate to {null(Channel Properties)}. This value must remain, in order for the Email resolution to correctly correlate to the Contact or Account. If this value is changed, it cannot be reset manually and the Create Case step must be deleted and recreated again.

HTH!

CRM ALM with Click Dimensions – My findings working with Click Dimensions

I’m currently working on a project that implementing Click Dimensions as part of the solution for email marketing and we are using Agile methodology in our project.

As part of the project ALM requirement we have 4 environments (Dev, Test, UAT, Prod) to maintain. And given Click Dimensions solution is unique across instances, we found it is a bit tricky to do development and deployment across environments. Below are the questions that we had during the project:

How to deploy a customized sitemap/ribbon? Some cases that we encountered:

  • We developed custom rule to hide/show “Send” button based on security privilege (only user with some specific privilege could send the emails), we modified the “Send” button to have the display rule, however when we deploy our solution to a different environment (Dev to Test for example), the “Send” button is referring to the originating environment account key.
  • We made some changes to the sitemap, as we want some of common ClickDimensions entities to be available in the other location in sitemap to provide better navigation for the users. Now when we deploy our solution to a different environment, ClickDimensions Settings page is broken, as it is expecting the previous environment account key.

The solution

keep-calm-and-go-back-to-basics

“Back to basics” – ClickDimensions is an xRM solution that built natively on top of Dynamics CRM. So, behind the scene it is a native CRM solution (ref: https://msdn.microsoft.com/en-us/library/gg309639.aspx). And after spending a fair bit of time comparing the DEV and TEST solutions, I can conclude that the only differences that these solutions file are:

  1. Location of Click Dimensions server (depending to the data centre of your Click Dimensions instance: US, EU or AU).
  2. Account key: unique across instances (DEV, TEST, UAT and Prod).

Note: It is adviseable to note down these keys for future reference.

So, to ensure my solution file, that is referring to ClickDimensions’ customisation, to be able to be imported at the target environment without any problem. Once I’ve exported the solution from my DEV environment, I just simply need to replace the difference to point to the target environment by unzip the solution file, edit the customization.xml, find and replace the references (e.g: Account Key, use any text editor such as notepad++ to replace all recurrence of DEV account key to the target environment’s account key).

Now, I’m able to import my solution to the other environment without any problem. It might require a bit of due diligence, but at least we could still following our project methodology.

HTH!

Quick Tip for CRM Admins: What is the security privileges that assigned to my users?

Recently I’ve been asked by some of my colleagues and the CRM admin of the client that I worked with to find a way of the security privileges that assigned to some users in their CRM Organisation.

The answer is: CRM out of the box comes with a handful of out of the box report (some of them might not relevant to the business and you would like to hide them and the guide is available here) and there is a hidden gem that we often missed/forget. The report is named “User Summary”.

UserSummaryReport

It will produce a matrix report similar to below (It is a bit ugly, as I need to hide the personal information)

ReportSample

Alternatively my colleague, Stephanus Natawardaja, has put a Fetch XML based report that will help you in checking the users security privilege in a nicer way: https://snataw.wordpress.com/2015/09/24/display-and-report-user-business-units-teams-and-security-roles/

HTH!

Microsoft Dynamics CRM 2016 Release Preview Guide is Released!

The latest Microsoft Dynamics CRM release preview guide is available. Can’t wait to see the new features in action, especially Document Generation and OneDrive for business integration.

Release_Preview_2016 Release_Preview_2016_2

Grab your copy of the release preview guide: http://download.microsoft.com/download/D/5/D/D5D38A09-6A5C-4DC0-8649-3A4F39A8F8F3/Microsoft_Dynamics_CRM_2016_Release_Preview_Guide.pdf

Overcoming Multi-Level Rollup Field Limitation

Currently I’m working on a project that has some scenarios that need to do rollup calculation in 3 or more level of relationship hierarchy. For a sample and imaginary case, I have an entity called Project that has one or more Project Milestones and each Project Milestones has one or more Invoices (Project 1 – N Project Milestone, Project Milestone 1 – N Invoice). And I would like to see the total paid invoice value at the project level so that the project manager could have a quick overview on the project budget vs invoice that has been paid. To achieve this, the first thing that come up in mind would be the new Rollup Field that introduced in Dynamics CRM 2015.

However, there are some limitations of rollup field: “A rollup attribute formula can’t reference another rollup attribute.” and “Rollup attributes can’t be used as a workflow event or wait condition. These attributes don’t raise the event to trigger workflows.” (https://msdn.microsoft.com/en-us/library/dn817863.aspx)

By looking at the limitations it seems we are a bit hopeless to achieve this in “codeless” way using rollup fields, now let’s develop a plugin for this requirement! Wait, there is a “codeless” solution for this, well at least the code has been wrapped and packaged in this Codeplex solution by Demian Raschkovan: https://calculaterollupfield.codeplex.com/.

So, to trick the limitation of rollup field, I need to create a container (simple field) to hold the rollup value and every time there is any change happened to the source that part of the rollup calculation, trigger a workflow to force calculate the field and copy the value to the hidden field.

Below screenshots are the way I achieve this functionality:

Entity and Field Configuration

  • Invoice Entity: A standard currency field

InvoiceEntity

  • Project Milestone Entity: A rollup currency field with a hidden currency field as the container.

ProjectMilestoneEntity

  • Milestone Paid Amount Rollup field Configuration

MilestonePaidRollupFieldConfig

  • Project Entity: A rollup field that referring to the hidden rollup field on project milestone entity and some fields to do the calculation on the remaining budget.

ProjectEntity

  • Project Paid Amount Rollup Configuration:

ProjectPaidAmountFieldConfig

  • Remaining Budget Configuration: A simple calculation from Budget Field subtracted by the Paid Amount

BudgetRemainingConfig

Workflow Configuration

  • Workflow on Create/Update of Invoice Entity: This will keep track the rollup on record creation or update of the rollup field. To achieve a seamless multi-level rollup, the rollup field must be calculated first to be stored in the hidden field by utilising Calculate Rollup Fields Custom Workflow Activity from the codeplex link above.

InvoiceWorkflow

  • Workflow on Create/Update of Project Milestone Entity:

ProjectMilestoneWorkflow

The Result

For the sample, I have a sample data of a project with some project milestones related to it:

ProjectSample

And then on the first milestone (M1), I created an invoice payment detail:

InvoiceCreation

When I refresh the project record, voila, the value is rolled up and calculated 🙂

Result

Conclusion

With this trick, we could achieve Rollup and Calculation without code. It is a big platform enhancement thank to the CRM Product team that allow us to achieve some basic calculation that previously can only be achieved by using custom code, but now it is simple configurable.

Hope this help!

Custom Case Origin, How to Change the Default Yammer Icon

Recently I’m working on a project that using the out of the box Case (incident) entity. In the entity customization, we are adding a new option for Case Origin field to capture an in-person case report. So I added a new option to Case Origin option set. However, by default the icon of the case will showing up Yammer icon:

Custom_Case_Origin

So to help the end user with a better visual appearance there is a method that described in this TechNet article to achieve this: https://technet.microsoft.com/en-us/library/dn660975.aspx

One of the tricky part of the instruction is to change the solution publisher to the default one to prefix all customization with “new_”. In my case instead of changing the solution publisher to the default publisher, I do the change from the default solution (Settings > Customizations > Customize the System). This will give any customization to be prefix-ed with “new_”.

The next tricky part is the naming convention. Be careful with the option set numbering (remove any commas) and the file extension (.png). As mentioned by the guide: “‘new_Incident_origincode_icon#.png’ where # represents the value for the custom option.”

Incident_Icon_Custom_2

Now once you saved and published the web resource the icon of the case will be changed.

Hope this helps!

Tips: How To Hide The Out of The Box CRM Reports From the End Users

Dynamics CRM out of the box has plenty of built in reports, however these reports might or might not relevant to the business of the user. So to avoid complexity for the end user, we want to make sure that only relevant reports from the out of the box reports to be made available to the user.

The TL;DR; answer is: make the report as personal report.

Now with the details, first of all we need to make sure the end user only have User level privilege on Read Report privilege.Report_Privilege

Then on the report record, navigate to Actions > and click on Revert to Personal Report

Revert_to_Personal_Report

And if required, you could assign the record to your admin so he/she could manage the report by sharing this to the other users in case they need it.

AssignToAdmin

Note: Personal reports are not solution aware, so you could not add these report in your solution. In case you need to revert the reports on the other environment, yes, it is a tedious work to apply them one by one.

Hope it helps!

Check The SQL Server Version When Developing SSIS for Dynamics Integration

One of a gotcha that I learned while working on SSIS development would be to checking the version of the SQL Server that will schedule the SSIS package and the Visual Studio version that compatible with the Server version. This MSDN article describe the list of compatibility https://msdn.microsoft.com/en-us/library/bb522577(v=sql.120).aspx

The table from the MSDN Article describe the “compatibility matrix” for the Server and Development tool required. For example, when I’m working on SQL Server 2012 environment, I need either Visual Studio 2010 or 2012 with SSDT, Visual Studio 2013 won’t be compatible for this.

Coming from Dynamics CRM development background, there are lots of things to learn from SQL Server world. So, hopefully my mistake could save up your time when developing SSIS, as at this moment I need to “convert” my package due to compatibility issue.

Quick Tip: CRM Field Editing Ninja

If you need to change some of the field’s behaviour such as:

  • Required level
  • Enable/Disable Auditing
  • Flagging the fields to be Searchable or not

Rather than opening the fields 1-by-1 to make the change, there is a shortcut to apply the same settings to more than 1 fields:

CRM_Field_Editing_Ninja

Select the list of fields that require the similar settings, click the Edit action to open the “Edit Multiple Fields” window to apply the changes to these fields.

A Gotcha with Default Entitlement Assignment on CRM Online 2015 Update 1

Recently one of the client that I’m working on had their CRM Online instance to be updated with Update 1. There are a couple gotchas that we encountered. One of them is the new feature to set the default entitlement to Case (incident) entity. This new feature is really good productivity enhancement for the service users, as they don’t need to manually assign the entitlement for some common requests.

However, it is depends on the implementation and business process. On my current implementation, I don’t use the entitlement when tracking a case (as it is for a public enquiry), therefore I exclude entitlement from my solution and removed the security privilege of Entitlement entity for generic users roles. Then, because of this new feature I received some questions from the users that they are no longer able to create case. By default, the automatic assignment is turned on.

So as a workaround, I need to turn off this default entitlement assignment by navigating to Settings > Administration > System Settings > Service and turn off the Automatically apply entitlement settings.

Administration

Settings

For more details of the default entitlement: https://msdn.microsoft.com/en-us/library/dn689025.aspx

Tips: Be Careful When Adding Currency Field to An Entity

Recently I got a weird issue when I’m trying to migrate the configuration data from the Dev environment to the other environment. I’m using the Dynamics CRM SDK’s ConfigurationMigration Tool to move these configuration records.

Apparently this is the error message that I received:

Error Message

Below is the import log:


** IMPORT TO CRM PROCESS LOG
** Log Start: 06/05/2015 09:28:35

Log started at : 9:28:35 AM
9:28 AM New Progress Event – Result: True – Entity: unknown – Parsing import data file
9:28 AM Progress Event – Result: True – Entity: unknown – Parse Complete
9:28 AM New Progress Event – Result: True – Entity: unknown – Beginning Import To CRM.. Importing 3 entities – 42 records
9:28 AM New Progress Event – Result: True – Entity: unknown – Running Schema Validation
9:28 AM Schema Validation – Result: True – Entity: ALL – Validating 4 Entities
9:28 AM Schema Validation – Result: False – Entity: (myconfigentity) – Missing Fields: transactioncurrencyid , transactioncurrencyid , exchangerate 
9:28 AM Progress Event – Result: True – Entity: unknown – Schema Validation failed for Missing fields on Entities, See log for missing fields
9:28 AM Progress Event – Result: True – Entity: unknown – Import Process completed
Log ended at : 9:28:35 AM

I’m spending some time in comparing the schema of my DEV and TEST environment, both of the environments has the same version of the customization solution, however what I’ve found is that in my DEV environment, I do have 2 rogue fields (transactioncurrencyid and exchangerate) for the failing entity, whereas in my TEST environment these 2 fields do not exist.

TransactionCurrencyId

The reason of this entity has these fields is because during the development of the entity I added a currency field that no longer needed when I have the clarity of the requirements and removed it before the solution made into our TEST environment. These fields cannot be removed on my DEV environment due to the nature of the automation of creation by the system.

So for my workaround in my scenario would be excluding these fields on the ConfigurationMigration Schema. I hope these rogue fields won’t add further implications because it can’t be removed, and I hope the system could automatically clean up the transactioncurrencyid and exchangerate fields when there is no Currency field at all in the entity.

Australian Data Centre Bug Workaround – “Invalid Argument” in Workflow/Business Process Flow Editor

Recently it’s been reported by my colleague and a fellow Australian CRM MVP, Guy Riddle, that there is a bug on Australian CRM Online on Workflow/Business Process Flow editor that showing “Invalid Argument” error screen:

AustralianBPFWFError

And on the Workflow editor it will produce an error log similar to:


Unhandled Exception: System.ServiceModel.FaultException`1[[Microsoft.Xrm.Sdk.OrganizationServiceFault, Microsoft.Xrm.Sdk, Version=7.0.0.0, Culture=neutral, PublicKeyToken=31bf3856ad364e35]]: A validation error occurred. The languageCode = 3081 not a provisioned or enabled LCID.Detail:

<OrganizationServiceFault xmlns:i="<a href="http://www.w3.org/2001/XMLSchema-instance" target="_blank">http://www.w3.org/2001/XMLSchema-instance</a>" xmlns="<a href="http://schemas.microsoft.com/xrm/2011/Contracts" target="_blank">http://schemas.microsoft.com/xrm/2011/Contracts</a>">

  <ErrorCode>-2147220989</ErrorCode>

  <ErrorDetails xmlns:d2p1="<a href="http://schemas.datacontract.org/2004/07/System.Collections.Generic" target="_blank">http://schemas.datacontract.org/2004/07/System.Collections.Generic</a>" />

  <Message>A validation error occurred. The languageCode = 3081 not a provisioned or enabled LCID.</Message>

  <Timestamp>2015-05-21T23:35:31.0011596Z</Timestamp>

  <InnerFault>

    <ErrorCode>-2147220970</ErrorCode>

    <ErrorDetails xmlns:d3p1="<a href="http://schemas.datacontract.org/2004/07/System.Collections.Generic" target="_blank">http://schemas.datacontract.org/2004/07/System.Collections.Generic</a>" />

    <Message>System.ArgumentException: A validation error occurred. The languageCode = 3081 not a provisioned or enabled LCID.</Message>

    <Timestamp>2015-05-21T23:35:31.0011596Z</Timestamp>

    <InnerFault i:nil="true" />

    <TraceText i:nil="true" />

  </InnerFault>

  <TraceText i:nil="true" />

</OrganizationServiceFault>

One of the workaround that my colleague found is to set the format to English (US). To change this, navigate to Options > Formats > Change “Current Format” to English (United States)

Options

US_Format

Now you should be able to work on Workflow/Business Process Flow editor again.

HTH!

Deploying Access Team Template Across Instances

The Problem

Dynamics CRM 2013 comes up with a new feature called “Access Team”. In this post I won’t discuss about “How access team works?” or “Why should I use access team?”, last year CRM MVP Adam Vero posted a really good article about it: http://blog.crmguru.co.uk/2014/05/16/why-use-access-teams-in-dynamics-crm-2013/ I would recommend to Adam’s article as the base source when implementing access team.

Now, despite of the usefulness of access team to track the record sharing, it does have some problem in the deployment: It is not solution aware and as we need to setup the access team subgrid in the form and the customization XML only recognise the access team template by it’s GUID. So, even you create a new Access Team Template with the exactly the same name you won’t get the access team subgrid right.

One workaround is to modify the form where the subgrid resides, remove the subgrid, then add and configure the subgrid back. This workaround is quite time consuming and quite impractical for ALM, where we need to deploy the solution(s) quite often.

Kingswaysoft to the Rescue

Initially I was thinking that the DataMigrationUtility which is included in the CRM SDK could do the job, but it does not support (does not retrieve teamtemplate entity) the Access Team Template entity. So, Kingswaysoft CRM SSIS Toolkit is the tool that I found could help me in this situation at this moment. Why? It does retrieve the teamtemplate entity and it does assign the GUID of the record to be the same as the original template (in my scenario it would be coming from the DEV environment).

If you need some “getting started” walkthrough to use this tool, I’ve posted an article about it here.

So, I quickly create an Integration Service Project in Visual Studio and configure the data flow as follow:

SSIS Setup

The package consists of:

1 Dynamics CRM Source (in my case, it’s pointing to my DEV environment)

Team Template

And depends on how many environment to be kept synced, you might need a multicast to distribute it to any required environments. Then based on the number of environments you require, create the CRM Destination with Upsert action to target team template entity:

Target Team Template

with the following mapping:

Target Team Template2

Run the package and wait until..SSIS Result

Now, I have a repeatable Access Team Template “Deployment Tool” that only takes about 5 minutes to setup, no code and quick 🙂

Dynamics CRM 2015 Product Deletion Bug Workaround

Recently I’m doing a cleanup on a brand new production environment which was provisioned through CRM Online trial. One of the entity that I tried to clean up is Product entity. With the enhancement on product functionality introduced in Dynamics CRM 2015 update, apparently I got below error message when I tried to delete the record:Error

After spending some time doing trial and error, apparently the solution is by disabling Auditing functionality on Product entity:

Disable Auditing

Now I’m able to clean up the records:Clean

There might be some fix that will be released by Microsoft, so I hope this is should be in one of the immediate fix. As this will cause more problems in the long run.

Hope this helps!

Tips: Keep Your CRM Solution File Slim

Keep yourself slim is an interesting topic from health perspective, but what does this title mean for Dynamics CRM customization? To start with, I’d highlight on what we could have in a Dynamics CRM solution. Based on MSDN article: https://msdn.microsoft.com/en-us/library/gg334576.aspx below are the list of items that can be added to a CRM solution:

Solution component

Most of the above items are relatively small in size (XML markup in customization.xml), however one part that makes the solution file becomes really big is the Web Resources, typical large files that attached to the solution are the image files. One of the consequences of having large solution file is solution import timeout (this problem happened quite often to me). So, I’d share my tips to overcome this issue.

First tips is separating the solution for deployment e.g: one solution for anything apart the images web resources and another solution to include the images. Note: be mindful on the sequence of the import (the images solution need to be imported first in this case).

Second tips is to check whether there is any unused web resource. To check this, I’m using XrmToolbox with “Web Resources Manager” plugin:

Web Resource Manager

Load the web resources, once loaded, there is a nifty feature on Tools menu called: Find web resources without dependency.

Find Web resources without dependency

This feature will list up the web resources without dependency (orphan record that uploaded but no longer used)Delete The Unused Web Resource

Now after this, it is your decision whether you would like to delete the record straight away or use this as your own reference. My suggestion would only use this for your reference, remove the item manually from the solution without deleting it.

Hope this helps!

Help(ing you) in Deciding Microsoft Dynamics CRM 2015 Custom Help Implementation

Last couple of weeks ago myself and Elaiza Benitez are collaborating in writing up some posts for the new custom help feature introduced in Dynamics CRM 2015: Help(ing you) in Microsoft Dynamics CRM 2015 with Microsoft Word and Help(ing you) in Microsoft Dynamics CRM 2015 using Office 365 and Microsoft SharePoint online. In the previous posts we mentioned the ways to implement custom help in Dynamics CRM 2015. Custom help is really important aspect in user adoption where the end users (who use the system) can find a guidance on how they will work with the system without the need to contact the trainers or support help desk to solve their lack of knowledge, especially when the organisation just rolled-out a brand new CRM system.

So, in this post I will share my thought on how we could compare the approach and get which one as the best fit to the situation. The first part that drives the decision is whether we would like to implement the custom help globally or per-entity based. Now let’s compare the pros and cons of each implementation and I will give my thought on what would be the typical scenario where the approach will be suitable/applicable.

Decision

Global Custom Help

Global custom help is applied system wide, regardless whether an entity is system entity (out of the box) or custom entity, when this functionality is enabled every time the user clicks on the help icon, they will see the custom help instead of the standard out of the box Dynamics CRM help page. Global custom help option might works the best with the next option (Append parameters to URL) so that the help site can redirect or point to the right resource. One of the sample of the implementation with minimum amount of code is covered by Scott Durow in this post. Now below is the analysis on the implementation:

Typical usage for:

  • Organisation wide implementation that has lots of custom entities and renamed most of the system entities, with minor or no 3rd party solutions involved.
  • Requires a centralised location to manage the help content (SharePoint for example).
  • Works well for an implementation where you have high level ownership of the system.

Pros compared to entity-based custom help:

  • Centralised location of help settings (system-wide settings).
  • Easier to maintain the content (will always be in the same location, depends on your routing/pointing logic).
  • Depends on the implementation, non-solution aware help might be helpful if you want to give different help content to a different instances.

Cons compared to entity-based custom help:

  • Not solution aware, needs a bit of admin task to make sure each CRM environment has pointed to the right help content.
  • You could not pick and choose on which entity that you would like to implement the custom help, which leads to the need to provide the content for each entities that you have in CRM (more work to be taken care of).
  • In alignment with the above point, you need to make the help content for each new custom entity created.

Entity-Based Custom Help

Entity-based custom help is applied on per entity basis. So you could specify on which entity the custom help will be applied. In implementing entity based custom help there are many options available, such as using CRM web resource, external web CMS/SharePoint or any other web pages that available to your users (intranet/public site).

Typical usage for:

  • ISV vendors to point the help content to your website knowledge article.
  • Small implementation that has minor customisation.

Pros compared to global custom help:

  • Solution aware, no changes required wherever the solution is deployed.
  • Tailored for each entity, no need to route the help to the specific topic/entity.
  • Have the flexibility to implement only to certain entity (ability to pick and choose).

Cons compared to entity-based custom help:

  • Need to configure the custom help on each entities that you would like to have the custom help (with greater flexibility there is more responsibility).
  • The help content can be scattered all over the place (e.g: help content for entity A is in SharePoint, however the content for entity B is in web resource).

Mixed Approach

You could mix the usage of global and entity-based custom help. The behaviour is the Entity-Based custom help will win. Example: You provide the global custom to http://www.bing.com/ (so the user know how to use search engine 🙂 ) and specified the custom help for contact entity to your SharePoint page. So, when users click to open the help on other entity for contact, they will see http://www.bing.com/. And when they open the help page on contact, they will see the SharePoint page.

This behaviour is useful when you would like to have a default location for custom help, but for certain entity the help will be given specifically. This is in accordance with ISV mindset that their content will be displayed wherever their solution are deployed.

Conclusion

I hope my thought can help-ing you in deciding the custom help implementation, please feel free to comment and add some ideas/feedback 🙂

Naming Convention for Dynamics CRM Updates

Following up the preparation in the new Dynamics CRM Online updates, there are some confusions in terms of the naming convention of the releases/updates. Looking back to last year’s update Dynamics CRM 2013 has an update called SP1. Now the new updates for CRM Online (code named ‘Carina’) has different naming convention: Dynamics CRM Online 2015 Update 1. It is confusing, isn’t it?

So, to answer this confusion, the Dynamics CRM product team just recently posted an update for this naming convention, that based on the version number of the release/update.

8228.releaseVersions.png-250x0

So for a summary on what happened, below is the quick summary on what Microsoft Dynamics CRM product team has formulised:

The following table shows CRM Online product names with their associated version numbers and code names.

Product Name Version
Descriptor
Version
Number
Release or
Update
Code
Name
Microsoft Dynamics CRM Online Fall ‘13 6.0.0 Major release “Orion”
Fall ‘13 6.0.1 Incremental update None
Fall ‘13 6.0.2 Incremental update None
Spring ‘14 6.1.0 Minor release “Leo”
2015 Update 7.0.0 Major release “Vega”
2015 Update 1 7.1.0 Minor release “Carina”

The following table shows CRM (on-premises) product names with their associated version numbers and code names.

Product Name Version
Descriptor
Version
Number
Release or
Update
Code
Name
Microsoft Dynamics CRM 2013 6.0.0 Major release “Orion”
2013 UR1 6.0.1 Incremental update None
2013 UR2 6.0.2 Incremental update None
2013 SP1 6.1.0 Minor release “Leo”
2015 7.0.0 Major release “Vega”
2015 Update 0.1 7.0.1 Incremental update None


HTH!

Getting Ready for The Dynamics CRM Online 2015 Update 1

Yesterday I just presented in Melbourne CRM User Group for the new features of Dynamics CRM Online 2015 Update 1.

There are a massive list of new features that I’m really excited to see it to be rolled out in the live CRM Online. Just to mention some of the top favorite features:

For some more information, the Release Preview guide can be downloaded here.

Below is the slides that I put up for my presentation with some of my personal notes/thought:

Enjoy!

Dynamics CRM Updates on Chrome showModalDialog Issue

First of all, thanks to Shilpa for this heads up information. As you may be aware, Chrome has removed support for Modal dialogue with 37 & above. Currently, a registry workaround is in place that will allow applications that use Modal dialogue to continue to function. This workaround will expire by end of April 2015. See below for more details.

http://blog.chromium.org/2014/07/disabling-showmodaldialog.html

CRM currently utilizes this Modal dialogue functionality. In order for customers, who are using Chrome browser, to continue to function, they need to upgrade to the below upcoming CRM versions:

CRM 2011 – A COD will be delivered on CRM 2011 UR18(On prem Only)
CRM 2013 – A COD will be delivered in CRM 2013 UR3(On prem Only)
CRM 2013 SP1 – Fix will be included in CRM 2013 SP1 UR3(Online & On Prem)
CRM 2015 – Fix will be included in CRM 2015 UR1(Online & On Prem)

These COD’s and releases are planned to be released next month (April).

So, stay tuned for the update from Microsoft!

Unsupported Customisation: Importing CRM 2011 Managed Solution to CRM 2015

Recently I worked on a piece of demo that requires a solution from codeplex with a solution file that have not been updated for CRM 2015. What I have left is the CRM solution that the author exported from CRM 2011 and what I have for the demo environment is a new CRM Online tenant that based on CRM 2015. While I could reverse engineer of the author’s works to fit into CRM 2015 solution (thanks to the author that providing the source code in Codeplex), but what I would like to know is whether the customization will works fine in CRM 2015 or not. So for testing I would like to import it into my demo org. As I posted before on the CRM solution compatibility matrix, CRM solution that exported from CRM 2011 definitely could not be imported to CRM 2015. This will throw an error as “You can only import solutions with a package version of 7.0 or earlier into this organization. Also, you can’t import any solutions into this organization that were exported from Microsoft Dynamics CRM 2011 or earlier.solution-import-error

Given I know the content of the solution majority are just web resource items, such as html pages, javascript files and CSS files, plus the customization still follow CRM 2015 best practice, the problem just coming from the solution that contain these items was exported from CRM 2011. So, after thinking a while and reading through each components of the solution, I found out that the component that restrict the solution import was coming from the version and SolutionPackageVersion attributes in ImportExportXml element in solution.xml. So, I tried to change it with the value that I derived from a CRM 2015 solution:

<ImportExportXml version="7.0.0000.4013" SolutionPackageVersion="7.0" languagecode="1033" generatedBy="CrmLive" xmlns:xsi="http://www.w3.org/2001/XMLSchema-instance">

Voila, now I could get the CRM 2011 solution to be imported to my CRM 2015 environment.

NOTE: Don’t ever try this for production environment and I share this only for testing/demo purpose only. Please always use the supported customization way.

Dynamics CRM Online Deployment Exam MB2-706

Today I took and passed the Dynamics CRM Online Deployment exam MB2-706. The title only mention Dynamics CRM Online, however when I look more carefully on the skills measured section, there are some topics that quite overlapped with the Dynamics CRM Installation exam MB2-708.

First of all, I won’t break the NDA of the exam but I would like to give my thought on the exam. And if you ask me anything about sample questions and answers, I would say upfront, but sorry I won’t give anything.

As I mentioned earlier on the post that there are some overlapped topics with the installation exam, however I was quite unprepared when I was given some questions that supposedly only applicable for on-premise installation. Then I spent the time of the feedback to point out the questions that not accurate for the Online Deployment. Apart from that, the rest of the exams questions completely reflects the items that listed on the skills measured.

For the preparation of the exam, I just used the Dynamics CRM Online Deployment MOC training material from PartnerSource, however the training itself is not sufficient to pass the exam. Referring back to the skills measured, there are some topics that were not covered in the Online Deployment training, maybe combined with the installation course would be beneficial. Reading the Implementation and Administration guide also a good supplement to prepare the exam.

And one more tip for the exam: Second Shot. Microsoft is offering the second chance if you don’t pass the exam for the first time. The Second Shot offer valid for MCP exams that is taken between January 5, 2015, and May 31, 2015. My tip on this Second Shot is not use this opportunity to memorise the questions, but to identify on which section(s) that we are weak at, then do better preparation for the second chance.

I hope this helps!

Bulk Unblock the Assemblies for XrmToolBox

I’m a big fan of XrmToolBox developed by Tanguy Touzard, it is a must have tool for Dynamics CRM Professionals.

One thing that quite annoys me is every time I download the tool, the assemblies are blocked (due to Windows security to prevent rogue assemblies to run on the machine). So, I found a way on how to unblock the assemblies in bulk using PowerShell.

The syntax goes like this:

gci &lt;your XrmToolBox folder&gt; | Unblock-File

eg:

gci c:\XrmToolBox | Unblock-File

Edit: a better trick to unblock all assemblies is by unblock the downloaded zip file first before extracting it. Ref: http://support.microsoft.com/kb/942532. Credit to Marco to mention it in Twitter post!

I hope this helps!

Chocolatey – A Must Known Tool For Developers

Recently I had a conversation with George Doubinski regarding an update required in Visual Studio to be able to work with the new Dynamics CRM 2015 SDK assemblies (it requires .Net 4.5.2 as the minimum .Net framework version). And he asked, you do use chocolatey to install the update, don’t you? And it was a shocking answer for him that I don’t know Chocolatey.

So, I quickly search and look at it: https://chocolatey.org/

Chocolatey NuGet is a Machine Package Manager, somewhat like apt-get, but built with Windows in mind.

I quickly install it and apply the .Net 4.5.2 Developer pack by executing the command: choco install netfx-4.5.2-devpack

Conclusion: Chocolatey is definitely a go-to tools to get an update for development tools.

New Data Integration Tool: Skyvia – Salesforce to Dynamics CRM Data Migration Revisited

Recently I’ve been introduced to a new data integration tool named Skyvia. So, I think it’s a good idea to give it a try and some review, given it is a free tool (at this moment, not sure whether they are going to go with licensing in future).

Skyvia is cloud based data integration service that has multiple connectors to multiple cloud CRM platforms, such as: Dynamics CRM, Salesforce, Zoho and SugarCRM and also cloud storage, such as Dropbox, Google Drive (unfortunately OneDrive is not there yet) and SQL Server.

So, when I tried to give it a go, I found it quite simple and intuitive to use.

There are 4 operations (called package) that Skyvia supports:

  1. Import
    Skyvia-ImportPackages
  2. Export
    Skyvia-ExportPackage
  3. Replication
    Skyvia-ReplicationPackage
  4. Synchronization
    Skyvia-SyncPackage

So, in my case I revisited my post on migrating from Salesforce to Dynamics CRM using this tool.

To get started, I create a new import package, for the Source component, this tool has these following options:

Skyvia-Source

And for the Target component, this tools has these following options:
Skyvia-Target

Select both Source and Target components, in this case I chose Salesforce as the source and Dynamics CRM as the target, enters the credentials for both components.

Then click on “Create New Task” button to configure the process. It will open up the configuration “Wizard” that will go through the source and target component mapping as the following screenshots. For sample purpose, I tried with Account object (entity):
Skyvia-SourceSalesforce
Skyvia-DynamicsCRMTarget
Skyvia-Mapping
Once the task configured, it’s the time to configure the schedule:
Skyvia-Schedule
Once everything configured properly, click on Save button to keep the changes.
Skyvia-Saved
Once the process kicks in or executed manually by clicking “Run” button, it will log the process under Run History table
Skyvia-RunHistory
So I just double check on my Dynamics CRM instance, there are new records that come from Salesforce!
Skyvia-Outcome

Edit: For more detailed technical documentation that will give clearer understanding of each configurations: http://skyvia.com/resources/docs/index.html

In conclusion, this is a good tool for simple cloud data migration/integration, however for more complex requirements I still need more advanced tools such as SSIS + Connector or Scribe.

Getting Attribute Values in Plugin Execution Best Practice: Use Pre/Post Images

Yesterday I just discovered from a discussion of a question, what I’ve known in a couple of years is not the best practice. The question was about how to get the entity attribute values from the record where the plugin was fired. Based on my previous knowledge, it should part of the plugin execution context. Yes, it is true for some operations such as Create and Update (based on the fields that updated). However, my next approach: if I could not find it in the plugin context: get it through retrieve request, is completely wrong. It adds server overhead when I add another request just to get the entity attribute details.

After reading this MSDN article: “Understanding the data context passed to a plug-in“, there is a line under Pre/Post Entity Image section that mentioned: “Registering for pre or post images to access entity attribute values results in improved plug-in performance as compared to obtaining entity attributes in plug-in code through RetrieveRequest or RetrieveMultipleRequest requests.

I’ve used the pre and post image to tackle some situational requirements, but now I know that what I’ve done was not right. It is probably an obvious or a well-known knowledge for most of the developers, but in case there are others that still using bad pattern as I do (I learned it from others’ sample as well), I hope this could change the development pattern and deliver the most efficient way in plugin development.

Dynamics CRM Solutions Compatibility Matrix (CRM 2015 – v.7)

There has been a couple questions in the forum regarding the solution compatibility after Dynamics CRM 2015 upgrade, so below is the matrix that MattB from Microsoft shared, I hope this gives us a clear picture on which version of CRM that the solution was originated will be compatible with.

image001

Tips on Working with Dynamics CRM 2015 Calculated and Rollup Fields

Dynamics CRM 2015 release brings a rich tool for system customizers to be able to do their work with less dependency with code. The most useful features in Dynamics CRM 2015 is the Calculated and Rollup Fields.

First of all there are some good post from fellow MVPs regarding these new features:

Calculated Fields (by Leon Tribe): http://blogs.msdn.com/b/mvpawardprogram/archive/2014/12/15/dynamics-crm-2015-calculated-fields.aspx

Rollup Fields (by Jukka Niiranen): http://niiranen.eu/crm/2014/12/analyzing-customer-behavior-data-crm-2015-rollup-fields/

So, I did my hands on with these new features to test and found out that some limitations in regards these new features:

  1. Currently there is no way to upgrade/update existing fields (Simple) to calculated or rollup fields. This situation could be common when there are some fields that calculated through other methods before (plugin/WF/js) that would like to be updated with the new functionality.
  2. The calculated or rollup fields need to be created first in metadata before it could be configured. Therefore if the configuration process was not completed during the creation of the fields there is potential “orphan” calculated/rollup fields that do nothing.
  3. The rollup fields are calculated asynchronously through the system job, therefore there will be some delay to get these fields to be calculated.

CalculateRollup

I hope this helps!

Dynamics CRM 2015 On-Premise and Online is Now Available

An exciting news, Dynamics CRM 2015 is released earlier than it’s expected. The download links for On-Premise is available now: https://www.microsoft.com/en-us/newsearch/DownloadsDrillInResults.aspx?q=crm+2015&cateorder=2_5_1&site

As well as the new CRM Online trial instances are provisioned as Dynamics CRM 2015. http://www.microsoft.com/en-au/dynamics/crm-free-trial-overview.aspx

To get started with the adoption and training for Dynamics CRM 2015, Microsoft Dynamics content team has put a good resource: http://www.microsoft.com/en-us/dynamics/crm-customer-center/training-adoption-kit-for-microsoft-dynamics-crm.aspx

Plus this Curah! links from Donna Edwards that really summarised the available content on the net: https://curah.microsoft.com/211516/crm-2015-helpful-resources

Dynamics CRM Product Social Media Reach

The Dynamics CRM Product Team now have extended their presence in the social media with their new Facebook apps that can be reached: https://apps.facebook.com/microsoftdynamics/

The Facebook apps featured the youtube page that also available: https://www.youtube.com/user/msdyncomm/DynamicsCRM, Twitter feeds about Dynamics CRM and quick links to some useful websites related to Dynamics CRM.

Tip: Consider Compatibility Issues When Deploying The Latest Techs

Last week I worked with a client that went live with their IFD implementation for CRM On-premise. The whole setup of the IFD ran smoothly for the internal and external access, firewall and TMG rules have been updated in place. However, we hit a problem when one of the main integration point, that usually has quite heavy traffic, does not work properly. So after some amount of time spent to troubleshoot, we finally just barely finished the deployment 3 minutes before the planned rollback as the previous system testing was failed.

So, the main reason of the problem is the incompatibility of SHA256 certificate that we used for the IFD with the older infrastructure (Windows Server 2003) where the integration to CRM was hosted. Luckily we found a KB Article and the hotfix for SHA256 compatibility with Windows Server 2003 and Windows XP: http://support2.microsoft.com/kb/938397. Once the hotfix from applied to the server the integration works properly.

The selection of SHA256 certificate itself was driven by the plan of deprecation of SHA128: http://blogs.technet.com/b/pki/archive/2013/11/12/sha1-deprecation-policy.aspx.

In conclusion, I learned something new to be reminded when deploying the latest technology (updates or upgrades or even simple certificate change), consider the existing systems, especially the one that going to be not supported anymore, whether they are going to work or not.

Dynamics CRM 2015 Youtube Video List

It is a great effort from the Dynamics CRM product team that producing the informative videos regarding the upcoming Dynamics CRM 2015 releases. These videos are really informative for everyone who is working with Dynamics CRM product to be ready to embrace the change and plan ahead with the implementation of the upgrade.

This blog post will be a life post that I will keep updating to combine the video list.

Upgrading from Microsoft Dynamics CRM 2013 to 2015

Field Level Security in Microsoft Dynamics CRM 2015

Business Process in Microsoft Dynamics CRM 2015

Update Process Enhancements with Microsoft Dynamics CRM Online 2015 Update

CRM for Outlook Configuration in Microsoft Dynamics CRM 2015

SLA Enhancements in Microsoft Dynamics CRM 2015

Rollup and Calculated Fields in Microsoft Dynamics CRM 2015

Configurability in Synchronizing Data with Outlook or Exchange in Microsoft Dynamics CRM 2015

Tablet Productivity Enhancements in Microsoft Dynamics CRM 2015

Hierarchy Visualization in Microsoft Dynamics CRM 2015

Hierarchical Security Modelling in Microsoft Dynamics CRM 2015

Microsoft Dynamics CRM 2015 Cortana Demonstration

Enjoy 🙂

Small Things that Often Forgotten in Plugin Development – Just 1 Tip Presentation

As requested by Ben on my previous blog post. I posted the slides of my Just 1 Tip presentation from the last Melbourne CRM User Group. The presentation focus is a quick tip on how we as developers are often forget the small details in event-driven solution design that could ended-up in a headache for the other fellow developers/business user to trace/test.

There are 3 issues that I commonly encountered during the design and development:

#1: Infinite Loop – a request inside the plugin code to the same message and field filter as the registered step and in the same entity.

#2: Auto-save – this will trigger the update request and if the plugin step registered is not filtered, it will trigger the plugin very often.

#3: Multiple Synchronous Events (Plugin + Real Time Workflow) – Tips of using XrmToolbox plugin to change the order of executions. (This section drove me to post the previous blog here).

I hope this helps!

Real Time Workflow and Plugin, Which One is Executed First?

Last weekend when I was preparing my presentation slide for the upcoming Dynamics CRM User Group regarding some gotchas in plugin development and with a short discussion regarding Real Time Workflow, there is a question in mind: If there is a Plugin and Real Time Workflow that registered on the same event, for example on update of field A on Contact entity, which one that triggered first? I’ve tried to find Microsoft’s documentation and could not find it, so in case anyone could point out the article/documentation, please let me know.

So to answer my own question, I setup a simple Real Time Workflow to update ‘jobtitle’ field to ‘Workflow’ on Contact entity every time I change the first name. And a plugin to update ‘jobtitle’ field to ‘Plugin’ on Contact entity every time I change the first name. To test this method, I did a bulk edit on contact record to change all their first name. And the result is… Plugins are executed first, then the Real Time Workflow. This is a conclusion of the test, as all of the records that I just bulk-edited has the value of Workflow, which mean the value specified will be the one that executed later.

Workflow

I hope this help us in designing the solution with multiple event-based processes. And to manage these execution order there’s a plugin for the famous XrmToolbox here: http://mscrmtools.blogspot.com.au/2014/04/new-xrmtoolbox-plugin-synchronous.html

Note: I personally would prefer not to mix Plugin and Real Time Workflow together to avoid confusion by putting the custom process that handled by the plugin to custom workflow activity and execute that custom workflow activity within the Real Time Workflow. However, there might be a case where the solutions are developed by multiple vendors and this kind of scenario could happened.


Update Rollup 18 for Dynamics CRM 2011 Is Released!

Update Rollup 18 for Microsoft Dynamics CRM 2011 is available, the KB article related to this release:

http://support.microsoft.com/kb/2958724

Download Link:

http://www.microsoft.com/en-us/download/details.aspx?id=44265

Some  important issues that this UR fixed:

  • If a user’s logon domain is different from the Fully Qualified Domain Name, Deployment Manager crashes while opening.
  • When a Managed Solution is imported that updates an existing solution that contains customizations from another Managed Solution, not all labels included in the update are applied to the system.


Update Rollup 1 for Dynamics CRM 2013 SP1 Is Released

Update Rollup 1 for Microsoft Dynamics CRM 2013 Service Pack 1 (SP1) is available, the KB article related to this release:

http://support.microsoft.com/kb/2953252

Download link:

http://www.microsoft.com/en-us/download/details.aspx?id=44262

Some issues that I encountered that fixed in this rollup:

  • Duplicate records created if Save or Save and Close is pressed multiple times
  • When programmatically making visible tabs that contain several subgrids, the size of these subgrids is not recalculated causing the layout to be scrambled.

Whitelist Addresses Used By Microsoft Dynamics CRM

Recently I’m working in an environment that controlled their network access through a proxy server. When I’m going to test some feature of CRM 2013 on CRM online, I could not be authenticated properly. So, after a quick discussion, apparently it is caused by some of the URL addresses that used by Dynamics CRM is blocked in the proxy settings. So, in case anyone encounter similar situation, the list described in this KB article might help: http://support.microsoft.com/kb/2655102

North America based organizations:
http://clientconfig.passport.net/ppcrlconfig.bin
• http://disco.crm.dynamics.com
https://login.live.com
https://dev.crm.dynamics.com
http://crl.microsoft.com/pki/crl/products/microsoftrootcert.crl
https://online.dynamics.com
https://mbs.microsoft.com
https://go.microsoft.com
• .windows.net
• 
.microsoftonline.com

South America based organizations:
• http://disco.crm2.dynamics.com
https://dev.crm2.dynamics.com
http://crl.microsoft.com/pki/crl/products/microsoftrootcert.crl
https://online.dynamics.com
https://mbs.microsoft.com
https://go.microsoft.com
• *.windows.net
• *.microsoftonline.com

Europe, Africa and Middle East based organizations:
http://clientconfig.passport.net/ppcrlconfig.bin
https://login.live.com
https://dev.crm4.dynamics.com
http://disco.crm4.dynamics.com
http://crl.microsoft.com/pki/crl/products/microsoftrootcert.crl
https://online.dynamics.com
https://mbs.microsoft.com
https://go.microsoft.com
• .windows.net
• 
.microsoftonline.com

Asia / Pacific area based organizations:
http://clientconfig.passport.net/ppcrlconfig.bin
https://login.live.com
https://dev.crm5.dynamics.com
http://disco.crm5.dynamics.com
http://crl.microsoft.com/pki/crl/products/microsoftrootcert.crl
https://online.dynamics.com
https://mbs.microsoft.com
https://go.microsoft.com
• .windows.net
• 
.microsoftonline.com

ADFS Service Won’t Start, How to Troubleshoot?

Recently I need to re-run the VMs of the CRM server setup on my test and practice machine. One of the stuff that I would like to test is to establish trust relationship between ADFS from one to another CRM deployments, therefore, I need to start my ADFS VMs. On one of the instance of the ADFS server, the ADFS won’t start for unknown reason and I got this error message when I looked at the event viewer: The Active Directory Federation Services service terminated with the following error: An exception occurred in the service when handling the control request.

ADFS_Error

The error message is seems to be generic exception message without any further details provided. After a quick research and looking around at the event viewer, I found more descriptive error message on: Applications and Services Log > AD FS > Admin

ADFS_Troubleshooting


The error message described the connection to SQL could not be established, as my practice ADFS setup is using internal database, it turned out to be the Windows Internal Database service is stopped.

Dynamics CRM 2015 is Announced

Yesterday Microsoft made an exciting announcement for Microsoft Dynamics CRM. The press release is announced here and the blog post from Bob Stutz is available here.

For us to get up to date with this release, this page from Microsoft Dynamics CRM Customer Center provide the overview of the new features introduced in Dynamics CRM 2015.

The Release Preview Guide also available here. The new features that highlighted in the release preview guide:

Dynamics Marketing

  • Multi-channel marketing
  • Enhanced Email editor
  • Campaign Management Console with the ability of A/B testing, cross channel operations and others
  • Integrated Social Listening with the embedded social insights for CRM
  • Sales Collaboration with marketing calendar
  • B2B Marketing with improved lead scoring and webinar integration
  • Marketing Resource Management with the marketing calendar
  • Internal Process Automation with approval workflows
  • Geographical Expansion to Japan and Russia

Sales

  • Improvements to the sales processes enabling branching of the process based on business rules
  • Product Families with the ability to bundle products and recommend related products for cross-sell/up-sell and simplify and minimize product management with product attributes (It seems the reason of Product Kit depreciation)
  • Sales Hierarchies with the support on mobile device.
  • Offline draft mode on table app

Customer Service

  • Further Case Management enhancements with the ability topause and resume SLAs, and tracking time of case on hold or waiting on customer

Microsoft Social Listening

  • Location filters
  • More geographic and languages to be supported

Platform enhancements

  • Enhanced Search Capabilities
    • Global search that works similar to the existing tablet app search
    • Search Bar added to navigation bar
    • Advanced find button added to the navigation bar
  • Synchronise additional types of information with Outlook with the new configuration wizard
  • Enhanced Business rules, which will be executed server side that will works everywhere (not only on web browser)
  • Enhanced business logic with If and Else If statements with AND and OR grouping
  • Pre-filling information when a record is created
  • Business process flows can now be accessed via the client API
  • Calculated fields and Roll-up fields are now added
  • Field Level Security is now supported for out of the box fields

From my perspective, the overall platform enhancement is a really significant enhancement for functionality and development capabilities of Dynamics CRM. Now we could use more point-and-click customisations to achieve some rules. Especially with the availability of server-side business rules, validation and logic will become easier to manage (compared to using plugin, where developer effort is required). Yet, still there might be some complex scenario that the usage of plugin is still required. In conclusion this release is closing our gap with what Salesforce.com always boasting of their platform. Global Search, Validation Rule, Approval Process, etc. and even we are one step ahead with the Advanced Find and graphical interface to construct business rules.

Preparing CRM Online + SharePoint + Exchange + Power BI Trial (Part 4)

PowerBI Integration

Power BI is a really good tool to provide self-service analytics with focus on data visualisation. Out of the box Microsoft Dynamics CRM is equipped with powerful charting capabilities. However to connect CRM data with external data, such as finance or ordering system, we usually need to do data warehousing exercise. With the availability of PowerQuery, PowerPivot and PowerView capabilities in Excel we could generate CRM dashboard with self-service filter analysis that merged with external data sources.

Preparing Excel Power View Dashboard

In this example, I will not connect to external data. But solely using the CRM lead data to show the demographics of where is the company’s most strategic places to market and sell. I will start with a basic Excel report that pulling down Lead data from CRM. Open Microsoft Excel with the latest Power Query installed. For installation of Power Query: http://www.microsoft.com/en-us/download/details.aspx?id=39379

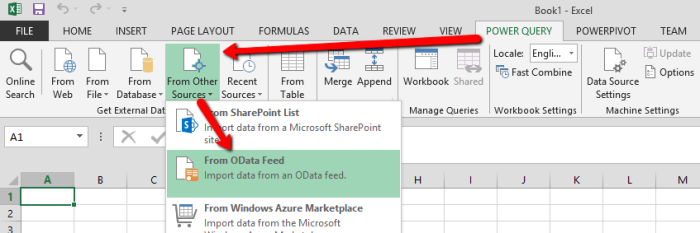
Selects Power Query Tab, select the data source From Other Sources > From OData Feed.

Power_Query

Previously I’ve made a post regarding the tips on only getting the relevant records by applying CRM OData Query in the oData feed here, so for this example, I will retrieve only open Leads:

Query_OData_Feed

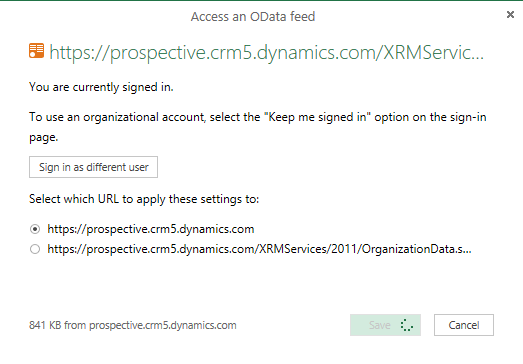
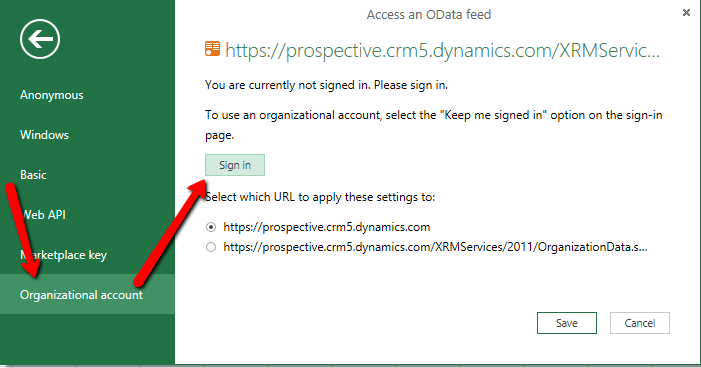
Then it will prompt the account selection, since we are on Office365 account, selects Organizational Account and click on Sign in to sign in with the Office365 account.

Sign_In_Office365

Once signed-in click on save and Power Query will do data retrieval from the CRM Server

PowerQueryProcessing

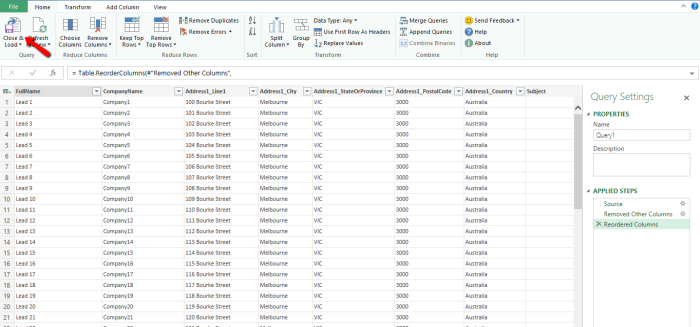
Once finished loading the CRM data, it will open up the Power Query Editor similar to:

PowerQueryResult

Then click on Choose Columns to select the columns that we care for this report (Full Name, Company Name, Address1_Line1, Address1_City, Address1_PostalCode, Address1_StateOrProvince, Address1_Country and Estimated Amount)

Power_Query_Choose_Columns

Once the columns selected, we could re-arrange the columns to make the data neat, then click on Close & Load

Arranged_Close_&_Load

It will load the query and pull the data from CRM to the worksheet, it might takes some time for large dataset.

Query_Being_Reloaded

Once loaded, we need to do some Power Pivot exercise to prepare the data model and manage the address fields to be recognised as address related data by right-clicking the Query click on Load to…. Choose both worksheet and Data Model

Power_Query_Load_to_Data_Model

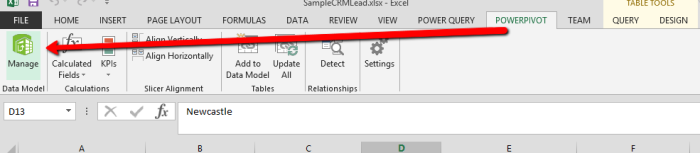
Once loaded, click the Power Pivot Tab and Click on Manage button

Power_Pivot_Manage_Data_Model

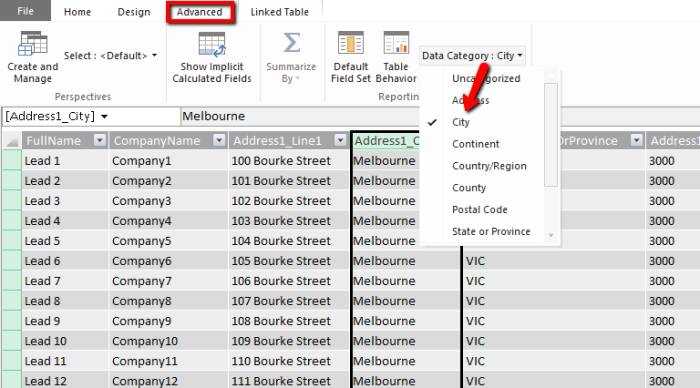
To mark the fields as address data type, click on “Advanced” tab on Power Pivot Select the columns header of the address data (street, city, state, postcode and country) and set the Data Category accordingly.

Mark_it_As_City

Once set, close the Power Pivot editor. To add the graphical view of this report, click on Insert tab and click on Power View

PowerView

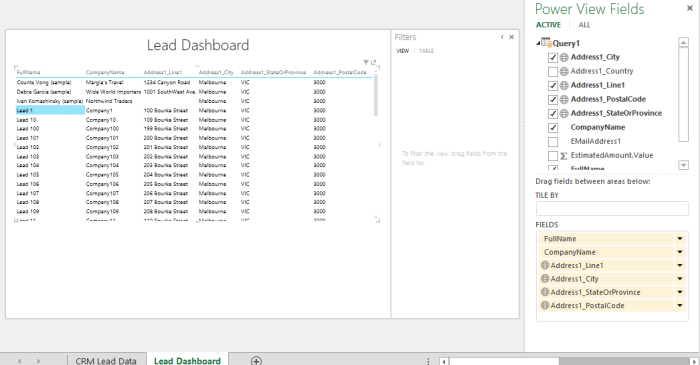
It will create a basic Power View dashboard similar to:

Power_View_First

Then we might want to configure the dashboard to show the map and some chart by clicking on the Design tab and might be ended-up to be something like this:

Lead_Dashboard

Save this Excel Spreadsheet to be used later on in Power BI site.

Setting Up Power BI Site

Since previously in this example we are adding Power BI subscription from an existing CRM instance on Office365 tenant, the Power BI provisioning might not set up the Power BI SharePoint Site directly. So, I need to either a new site for Power BI or use an existing site. For this trial preparation, I will create a separate site for the Power BI purpose.

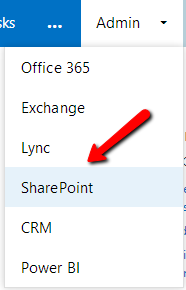
In Office365 admin portal, click on Admin navigation and click on SharePoint.

SharePointAdminPage

Click on New > Private Site Collection

NewPrivateSiteCollection

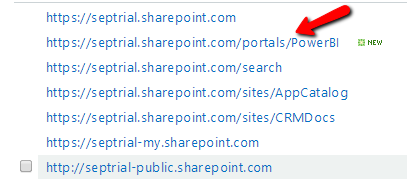
I called the site as PowerBI and use the Business Intelligence Center as the template.

PowerBI_Site_Setup

Once the site has been successfully provisioned by SharePoint, go to the site.

Power_BI_Site

It will Display the default page with some instruction of BI capabilities. To add Power BI functionality to this site, click on Site Contents at the left hand side navigation.

Power_BI_Setup

It will show the list of available components and apps to be added, click on Power BI to add Power BI functionality to the SharePoint site.

Site_Content_Power_BI_Apps

It will then showing this big banner of Power BI, I choose to Use my own data, as I’m going to use the data from CRM.

PowerBI_Landing

Then it will close this modal dialog window and show the main features of Power BI (Featured Reports, Dashboards and Data Connections)

PowerBI_First_Time

On Dashboards, click on (+ add) or drag the Excel Power View Report that we create previously.Excel_Report_Uploaded

Once uploaded, click on the tile to view the dashboard. Copy and keep the URL of this page to be used later in CRM Dashboard iFrame setup, the URL will be similar to: https://septrial.sharepoint.com/portals/PowerBI/_layouts/15/WopiFrame.aspx?action=embedview&sourcedoc=%7b85c0bf22-01a7-400e-91f3-ae91b174e110%7d

On_Power_BI

One of the coolest feature of Power BI is to set data refresh. Click on … at the bottom right of the dashboard tile to schedule the data refresh.

Excel_Schedule_Data_Refresh

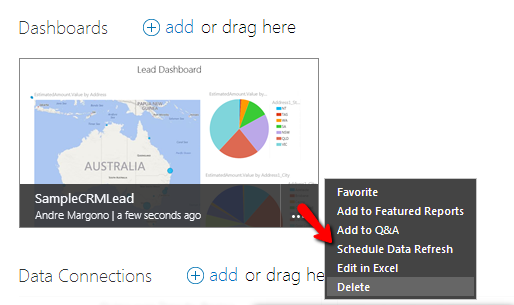
The refresh schedule provides intuitive scheduling functionality for us to schedule data refresh:

Refresh_Schedule


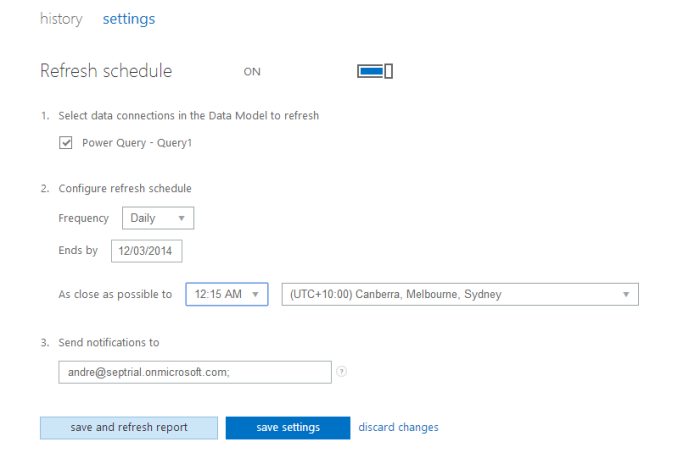
Edit: Based on the list of external data that currently supported, it seems scheduled refresh for data from CRM Online is not supported yet. So, I think this is a feature that would be nice to be supported soon. It will resulting into an error of data refresh like:

Power_BI_Power_Query_Error

Ref: http://office.microsoft.com/en-us/office365-sharepoint-online-enterprise-help/use-external-data-in-workbooks-in-sharepoint-online-HA104054001.aspx

CRM Dashboard Setup

To get the Power BI Report to be shown in CRM’s Dashboard we could not use Personal Dashboard and we need to use System Dashboard due to iFrame Cross-Frame Scripting limitation on personal dashboard.

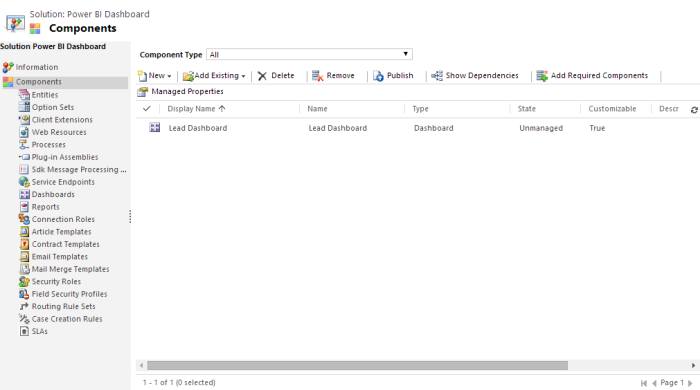
So, for this example, I created a brand new Solution called “Power BI Dashboard” and create new Dashboard and named it as “Lead Dashboard”

Power_BI_Solution

In this Dashboard, I added an iFrame component. Important: uncheck the cross frame scripting to ensure the dashboard works properly.

Dashboard_iFrame

And then add a couple CRM charts and views to completely assemble a simple Lead Dashboard in CRM that integrated with Power BI:

PowerBI_Dashboard_on_CRM

Conclusion

Setting up Dynamics CRM with other Microsoft stacks on the cloud (Friends), is so much easier than deploying each individual components On-Premise. This whole example setup can be completed in a small number of hours to setup, where if these setup took place On-Premise it could take a couple of days of effort to setup. A big thanks to Microsoft cloud services, especially the CRM Online and Office365 team to keep improving the experience in their cloud services provisioning.

Special thanks for Sarah Ashton to provide the feedback before I posted this series 🙂


The whole series of “Preparing CRM Online + SharePoint + Exchange + Power BI Trial”:

Preparing CRM Online + SharePoint + Exchange + Power BI Trial (Part 3)

Setting Up Server-based SharePoint Integration

Dynamics CRM Online Spring’14 release introduced the new Server-based SharePoint Document Integration. How it works? Scott Durrow has discussed the detail of the new SharePoint Integration in 2 parts:

http://develop1.net/public/post/SharePoint-Integration-Reloaded-Part-1.aspx

http://develop1.net/public/post/SharePoint-Integration-Reloaded-Part-2.aspx

Before configuring the CRM side of SharePoint Integration, of course we need to setup the SharePoint site that will be used as the document location. Navigate to Office365 Admin Portal, click on Admin > SharePoint

SharePointAdminPage

It will open the list of SharePoint site collections, for CRM document specific I create a new site called CRMDocs to separate this documents from other SharePoint team sites.

If you would like to skip this step and configure Power BI straight away, click here to jump to Part 4.

Note: The following site creation process is applicable to both Online and On-Premise SharePoint deployment models. The difference is that by the time I’m writing this example, Server-based SharePoint document integration is only available on CRM Online. I hope this model will come down to On-Premise deployment as well to have the seamless integration between these two awesome technologies.


To create a new site, click on New and select Private Site Collection:

NewPrivateSiteCollection

I chose Document Center from the template:

DocumentCenterSharePoint

When SharePoint finished working on it… grab the URL of this SharePoint site to be used in CRM configuration.

SharePointURLForDocs

To get started on setting up the Server-based SharePoint Integration, if your CRM Online instance has not been configured with the Server-Based SharePoint Integration or you have not dismissed the notification to enable, it will show the notification below the CRM Navigation area.

EnableSharePointServerSide

If you have dismissed this notification, you could go to Settings > Document Management > Enable Server-Based SharePoint Integration

Document_Management

Enable_Server-Based_SharePoint_Integration

It will open up the window to configure the SharePoint URL, copy and paste the SharePoint site URL that configured previously:

Server_Side_Sharepoint_Setup

Click on Next and it will open up some validation whether the SharePoint site that we are referring is valid to be used for Dynamics CRM document repository. Important: Please read the Note and Disclaimer below the validation to ensure it does not break any of your privacy policy and once server-based integration, the older client-side integration can’t be enabled/used anymore.

SharePointServerSideValidation

Click on Next and it will show the final screen

ServerBasedSharePointFinalised

Wait, it’s not over yet, once the server-based SharePoint Integration’s been established, we still need to configure the folder generation (see the final screen message). Navigate to Settings > Document Management > Document Management Settings

Document_Management_Settings

Now we will be given the selection on which entities that we want to have SharePoint Document Integration to be enabled. And fill the same SharePoint URL that provided in the Server-based SharePoint Integration setup before.

EntitiesInDocumentManagement

Next, the configuration screen will show the folder structure selection. There are 3 options available:

  1. Not Based on Entity
  2. Based on Entity: Account
  3. Based on Entity: Contact

SharePoint_Folder_Structure

The detail of this structure is described in this Dynamics CRM Customer Center page: http://www.microsoft.com/en-us/dynamics/crm-customer-center/manage-sharepoint-documents-from-within-microsoft-dynamics-crm.aspx

And Magnetism Solutions’ Colin Maitland has thoroughly draw the folder structure diagram of SharePoint’s Document Integration

http://www.magnetismsolutions.com.au/blog/colinmaitland/2014/04/27/planning-for-microsoft-dynamics-crm-2013-and-microsoft-sharepoint-2013-2010-document-management-integration-part-2

The selection of the 3 options is completely depends on how you work with CRM, some common examples:

Not Based on Entity folder structure might be good if you would like to group the documents based on each entities (flat structure, this is common in xRM implementation that not using much of CRM sales/service/marketing capabilities).

Based on Entity: Account folder structure might be best fit if you are using sales process that based on B2B scenario where businesses are your primary customers.

Based on Entity: Contact folder structure might be best fit if you are using sales process that based on B2C scenario where individuals are your primary customers.

Once decided on which folder structure option that will be used for SharePoint document integration, click on Next. The configuration will show an alert that the document libraries are being created and showing the progress of the creation:

Document_Libraries_Are_Being_Created

DocumentNotBasedOnEntity

Congratulations, you now have SharePoint Document Integration configured. Now it’s the time to see it in action. Since for this example I have selected the folder structure “Based on Entity: Account”, let’s open an existing account record and open the Documents associated view.

OpenDocumentsOnAccount

If it’s the first time you open the Documents associated view, it will prompt you to confirm of that particular record folder creation in SharePoint. Note: the previous folder creation during the Document Management Settings configuration is only creating the base folder structure that does not create the “child” individual folder for each records in CRM.

ConfirmFolderCreation

In case you clicked on cancel, you still be able to add the location from the associated view command button:

Add_Document_Location

Once finished you could upload the documents into SharePoint seamlessly from CRM

Documents_Uploaded

To open the folder in SharePoint, click the OPEN SHAREPOINT command button, it will open up the SharePoint document list similar to this. Note: since I configured the document structure as Based on Entity: Account, there is opportunity folder created, as I tried to upload a document in this account’s related opportunity.

Document_in_Sharepoint

The good thing about SharePoint Integration, depends on your SharePoint Search configuration, you could use SharePoint Search to search your documents:

SharePoint_Search

Tips on “Better Together”-ness between CRM, Exchange and SharePoint is the Task Synchronisation between Exchange and SharePoint. Since we have established the Server-Side Exchange Integration between CRM and Exchange Online, the tasks synced from CRM to Exchange online is synced to your Newsfeed and we will have a great timeline of the tasks on our Office365 portal.

Newsfeed_Tasks_Sync

Next, moving on to the final part, Part 4  here

Preparing CRM Online + SharePoint + Exchange + Power BI Trial (Part 2)

Setting Up Server-Side Exchange Integration

Pre-requisite:

Before setting up the Server-Side Exchange Integration, make sure that the user has been assigned with the Exchange License (similar to my previous tips here) and has the email address set up properly to ensure the smooth integration with CRM.

EmailAddress

CRM Configuration:

On CRM instance, navigate to Settings > Email Configuration then configure the Email Server Profiles. By default CRM Online will create the Exchange Online profile if the Exchange Online is on the same Office365 instance.

Exchange_Online

Then go back to Settings > Email Configuration > Email Configuration Settings to set the CRM-wide email configuration.

Email_Configuration

For this example, I’ll use pure Server-Side Exchange Sync to sync both incoming and outgoing emails and also task, appointment and contacts. Email router obviously is another option, but since it is cloud deployment and on same Office365 tenant, it’s better to use the technologies that based on Office365 as well. Another option if you know that the people in your organisation uses Outlook desktop client, instead of the OWA, you could configure the Incoming Email, Outgoing Email, Appointments, Contacts and Tasks to use Outlook client.

Email_Configuration_Setting

Once the system-wide email configuration has been setup properly, make sure to approve and test & enable the mailboxes to ensure that the users are able to send emails, otherwise an error message similar to this will pop-up when trying to send email in CRM:

MailboxDisabled

To approve and test & enable the mailboxes, navigate to Settings > Email Configuration > Mailboxes, then select the mailboxes that need to be approved and after it’s approved, Click on Test & Enable button.

Mailboxes

Open the mailbox detail to see whether the tests successful or not:

MailboxConfigurationTestSuccess

The log of success/error will be listed up under the “Alert” view of the Mailbox record:

Mailbox_Alerts

TestMailboxSuccess

Now, it’s the time to try this server-sync functionality. I tried it by opening a contact with my work email address and send an email activity:

Sending_Email

And it comes through to my desktop outlook client:

EmailSent

And I reply back to the email and it’s tracked on the contact’s activity conversation:

EmailTracked

To check whether the server-side synchronisation works on the server side, open the email on Outlook OWA page:

OWAIncomingEmail

And the tasks are also synced:

Task_Sync

References:

http://msdn.microsoft.com/en-us/library/jj863707.aspx

http://www.microsoft.com/en-us/dynamics/crm-customer-center/set-up-email-through-server-side-synchronization.aspx


Moving on to Part 3 here

The whole series of “Preparing CRM Online + SharePoint + Exchange + Power BI Trial”:

Preparing CRM Online + SharePoint + Exchange + Power BI Trial (Part 1)

This article will run through the process provisioning of CRM, SharePoint, Exchange Online and Power BI trial, then will discuss on how to setup of the integration between these services as it’s been frequently asked by colleagues and in forum.

First step is registering for the CRM Online trial. In case, anyone got caught in the license assignment issue of the CRM Online trial, look at my previous blog post here. To register for CRM Online, visit: http://go.microsoft.com/fwlink/?LinkId=252780 and fill-in your details:

Trial_Provisioning

Tips: It’s advisable to use private browsing/incognito windows when you are signing up for any kind of Office365 services to clear out any existing Office365 sessions.

Keep moving on with the process and wait until the provisioning finished.

Provisioning_Ready

Once your Dynamics CRM trial provisioned properly, add the other Office365 trial (SharePoint, Exchange and Power BI) by opening the Office365 admin portal: https://portal.office.com/default.aspx

And click on Purchase Services navigation

PurchaseServices


Selects Trial for: Power BI for Office 365 with SharePoint Online (Plan 2) with Yammer and confirm your order.

TrialPowerBI

On the admin portal dashboard it will show the status of SharePoint and PowerBI is currently being provisioned:

SharepointPowerBIProvisioning

To add Exchange Online service, go back to Purchase Services and select the Office365 ProPlus Trial

Office365_Pro_Plus

Once the order confirmed, it will redirect back to the Admin portal and showing that it is currently provisioning the Exchange, Lync and another SharePoint Online

Office365ProPlusProvisioning

Wait until these services ready.

Tips: Changing the CRM Organisation Detail

A quick tips to change your CRM organisation details: By default the organisation name assigned to your CRM instance will be your company name provided during the trial sign-up and the organisation URL will be related to the username specified during the sign-up process. For demo purpose the organisation name might need to be changed to the prospect’s company name. To change the CRM organisation name:

On Office365 admin portal, click on Admin navigation and select CRM

AdminCRMChangeName

It will open the CRM administrative functionality, such as managing your instance and sandboxes. To change the organisation name, click on Edit button on the organisation that you wish to be renamed:

EditInstance

Rename the Friendly name and/or the URL Name and click save:

OrganisationRename

Now notice that the CRM Online Organisation is re-named as the new one:

NewOrgName


Moving on to Part 2 here

The whole series of “Preparing CRM Online + SharePoint + Exchange + Power BI Trial”:

Microsoft Dynamics CRM Licensing Guide

A quick post. I found this useful page when I was searching the new licensing model for CRM Online: http://www.microsoft.com/en-us/dynamics/resource-library.aspx?SortField1=Microsoft%20Dynamics%20CRM&SortField2=Licensing

I hope this helps anyone that looking for licensing model and preparing tender documents 🙂

Dynamics CRM Online Trial Provisioning Issue: Here the Fix!

Microsoft recently upgrade the experience in provisioning the CRM Online Trial. The process that took quite long time now has been reduced into a couple minutes. This is a good sign in terms of speed in quality service. Unfortunately with this speediness, I found out it is not perfect yet. So here’s what I found…

I run a new CRM Online instance today for demo and test purpose, so I entered the trial, configured the instance as usual, however once the process finished and I opened the CRM Online instance, I got a whole heap of errors: “You do not have sufficient privileges to view this chart. Contact your system administrator.“ on dashboard charts and the only available navigations are Service and Settings. My first impression: what’s going on? I’m the full system admin: my security role is admin & I’m the admin of the Office365…

CRM_Online_Provisioning

So, after a short head scratch and wondering why it’s happening… I found out the underlying issue: Even though I’m the “Admin”, but I’m not assigned with the license (doh).

To fix this, I need to go to Office365 admin page, navigate to Users & Groups > Active User > Click on the User

Manage_User

Navigate on licenses, then assign the correct licenses and click on Save.

Setting_Licenses

Wait a couple seconds… Refresh CRM page and…

Now_It_Showed_Up

I hope this helps others to troubleshoot CRM Online Trial Provisioning

Converting Single Line Text to Multi-Line Text Using CRM SDK’s Configuration Migration Tool

It’s been quite often that I’m requested to change the text field from single-line to multi-line or vice-versa. To achieve this usually I would suggest the creation of a brand new multi-line text field with different names and the other interfaces/integration that referring to the single-line field need to be adjusted to refer to the new field.

Today, I made a short experiment to change the text field type of a field in CRM and found a way to backup the data of the text field and reload the data once the new multi-line field with the same name using the SDK’s Configuration Migration Tool.

To get started on how to use the tool, I’ve posted a simple post on how to use the tool here or more detailed one from Jukka here.

Disclaimer: USE THIS METHOD AT YOUR OWN RISK. PLEASE BE AWARE THAT ANY INFORMATION YOU FIND MAY CAUSE DATA LOSS, PLEASE TAKE A BACKUP OF YOUR DATA BEFORE PROCEEDS.

First this is the sample of a single line text field on account entityShortText

Open the Configuration Manager tool, select Create schema option and continue with login. Once logged-in and fetched the CRM metadata, include the fields that going to be converted:
Export

Then continue with Save and Export, save the schema and the exported zipped file of the record.

Once, the export finishes, delete the field from the entity and create the field with the same name with type of Multi-Line text (don’t forget to publish the customisation):
LongText

Then go back to the Configuration Manager and select Import Data option and load the previously extracted zip file:
Imported

Now I have the multiple-lines text field with the same field name without losing previous data
MultipleLines

Notes: I tested this method on other data types and apparently the schema validation do not work.

I hope this helps!